Devices
In this part of RaceStudio 3 you can view and manage all AiM devices connected to your PC.

The Devices window is vertically divided into two parts:
Left (Filtering): Choose which connected AiM device to work with.
Right (Details): Contains multiple windows, each dedicated to a specific functionality.
The available windows depend on the selected device and its firmware. Windows for unsupported functions are not shown.
Live View
Available only for devices with a camera that support video streaming, such as all SmartyCam models. From here, you can fine-tune the camera’s field of view directly in RaceStudio 3. You can also save a snapshot of the current view to help you position overlays in areas with free space.
Live Measures
This window shows a table with the current values of all channels managed by the device. You can calibrate channels, force channel values to test alarms, or trigger the start recording logic.
CAN Status
This window shows the status of the CAN buses. There’s a row for every bus on the device, AiM CAN included.
In the blue line, the name of the CAN bus the status pertain to, and a string describing the general status. Please notice that the general status is based on TEC and REC, described in what follows.
Possible values:
"ACTIVE": CAN BUS is running without any problems (the node transmits dominant bits) (TEC/REC<=127)
"PASSIVE": Passive errors have occurred (the node transmits recessive bits) (TEC/REC>127)
"WARNING": BUS warn errors have occurred (TEC/REC>96)
"BUS OFF": BUS off errors have occurred (the node is physically disconnected from the bus) TEC>255)
Below the blue line, three areas. Leftmost, the bus load. Centered, CAN errors. Rightmost, CAN events.
Bus Load
Computed every second, shown as a progress bar representing load percentage.
CAN errors
REC: Receive Errors Counter
TEC: Transmit Errors Counter
RX Passive: 0 for normal status, activated when the transceiver automatically sets into passive mode after many receive errors.
CAN events
rx: Total received frames
rx_q_ovf: Number of dropped frames in receive due to a full queue
tx: Total transmitted frames
tx_q_ovf: Number of dropped frames in transmit due to a full queue
err: Number of LEC notifications error
warn: Number of warning bus status events
bus_off: Number of BUS OFF status events
GPS Status
This windows shows both the GPS status and the satellites in view, with the same logic implemented on the device.
There’s a row for the GPS status. It includes the number of satellites in view and the number of satellites used to compute the navigation solution (position and speed). It includes also the value of the fix of the solution itself, and the signal strength (averaged over the best 5 satellites).
The satellite rows describe how many satellites are available for the navigation solution (for every constellation) and how the information coming from them is used.
The flags describe which information is coming from the satellite:
svUsed : Satellite used in navigation solution
diffCorr : Differential corrections available
orbitAvail : Orbit information available
orbitEph : Ephemeris available
unhealthy : Satellite unhealthy
orbitAlm : Almanac available
orbitAop : AssistNow Autonomous orbit prediction
smoothed : Pseudorange smoothing applied
The quality describes with a number how computations are made over the satellite.
0: no signal 1: search 2: acquired 3: code lock 4: code and carrier lock 5 or more: code and carrier lock and time synchronized
Carrier to Noise Ratio (in dB-Hz) is available for every satellite. Long story short, it’s the signal strength (for GPS, CNO values typically range from around 20 dBHz for weak signals to around 50 dBHz for strong signals).
Live CAN
Important
Live CAN is available only for connected devices whose firmware supports live CAN sniffing. If the selected instrument does not offer this capability, this window is not shown. A CAN connection alone does not imply support for Live CAN.
This window shows CAN messages supplied by the connected instrument in real time. Use it to inspect frame identifiers, payload bytes and message timing, or to check how a protocol decodes the traffic.
Opening and Controlling the Live CAN Stream
Connect and power on a supported device, then select it in Devices.
Open its CAN Messages tab: this is the Live CAN window in the current interface. Keep the device connected while inspecting the stream.
Use the pause icon to stop receiving and refreshing the live stream in this window. Its tooltip is Click to stop CAN sniffer stream from device. Use the play icon (Click to start CAN sniffer stream from device) to resume.
These controls govern the live stream to RaceStudio 3; they do not start or stop recording on the instrument.
Reading Live CAN Frames and Channels
Organize > By ID groups messages by identifier, with the latest payload and timing statistics. By time shows the most recent messages first, up to the last 100 frames.
View offers Hexadecimal, Binary, Decimal and Characters for the payload. Use the statistics-window button to choose 1 s, 2 s, 5 s or 10 s.
Use the frame markings and Filter menu to show the messages you need. Clear filters restores Show all and clears those markings.
Use Apply protocol to decode a known protocol. Protocol Wizard suggests candidates by comparing the identifiers received so far with those used by available protocols. A matching set of identifiers is a candidate to check against the sender’s specification.
Note
Decoded channel values are raw values, with Gain 1 and Offset 0. Check the required conversion before interpreting them as physical measurements. The same frame display and channel-editing tools are described in Reading and Filtering CAN Frames and Inspecting Decoded Channels.
Changing between By ID and By time clears the current frame history and channels. Clearing all lists has the same effect. If the stream is paused, resume it to receive new frames. Apply the protocol again when needed.
Keeping CAN Traffic for Later Analysis
The Live CAN window does not save the incoming stream as a recording on the PC. To retain traffic, use a device that supports CAN-frame recording and configure its recording mode. Download the resulting recordings through Data Download, then use Sniffed Data Analysis to inspect them offline.
Data Download
Use this window to copy recorded sessions and, where supported, videos from an AiM device or its removable recording card to your PC. The files offered depend on the selected source. Downloading the files and preparing them for Analysis can involve separate processing stages.
Preparing a Device or Memory Card for Download
Connect and power on your device using a connection supported by that model: USB, Ethernet or Wi-Fi. For Wi-Fi, join the device’s network first; see Available Devices (Wi-Fi). For a removable recording card, finish recording before removing it from the device, insert it in a PC card reader, and wait for RaceStudio 3 to recognise it.
Open Devices, select the device or detected memory card in the left list, and open Data Download. Wait while RaceStudio 3 looks for downloadable files.
Before transferring files, check Data Download Preferences. The data and movie destination folders, folder structure and file names come from these preferences. In Advanced > Analysis Mode, include RaceStudio 3 Analysis if you want compatible downloaded sessions to be added to its database.
Keep the device connected and powered, or the card in its reader, until the operation finishes. An unavailable device or an unrecognised card cannot supply a file list.
Choosing the Files to Download
Expand the recording groups to see their individual files. Click the selection icon on the left of each row to include or exclude that file. Check the selected-session count at the top of the list before proceeding: automatic selection follows your download preferences.
Check the data and movie files you need. A video is only available if it was recorded and is accessible through the selected device or card.
Unhide Downloaded reveals files already marked as downloaded; their rows show Already Downloaded. Hide Downloaded hides them again. Use Refresh List to read the source again.
Hover over a row’s information icon to inspect its properties and the Will be saved into destination. These names can change when you choose the download properties in the next step.
Where session merging is supported, the options button offers Do not merge sessions, Merge sessions of the same day and Merge all sessions. Check this choice if you want separate recordings to remain separate in the downloaded output. These options do not merge movies.
Starting and Checking the Download
Press Data Download. If destination files already exist, review their names before answering the overwrite question: Yes replaces them, No skips those files while keeping the others selected, and Cancel stops this download request.
In Choose values for downloaded files(s) properties, review the fields offered for this source, such as Racer, Vehicle, Championship and Session Type, then press OK. These values can affect both session properties and the generated folder and file names.
If those changes produce another existing destination name, RaceStudio 3 asks about that file too. If it reports duplicated file names, correct the download naming settings before starting again.
Follow the progress shown on the rows. The download button becomes Cancel while the operation is running. Wait for file transfer and any parsing, conversion or database import to finish, and review any error messages.
After the operation, the list is refreshed and the Data Download button is restored. Successfully handled recordings can disappear from the list when downloaded files are hidden; use Unhide Downloaded to see them again.
When RaceStudio 3 Analysis was included in Analysis Mode, successfully imported sessions are available in its database. Open RS3A, select the required session and choose Open selected session(s) for analysis. See Open Downloaded or Imported Data for the full opening procedure and RaceStudio 3 Analysis for the Analysis tools.
If the files were copied without being imported into that database, use the import procedure in Open Downloaded or Imported Data and select them from the download destination.
Cancelling and Resolving Download Problems
To stop an active operation, press Cancel and wait for RaceStudio 3 to finish stopping the current work and restore the controls. Files completed before cancellation may already be on your PC. Review the result and the overwrite questions before retrying.
No new file available can mean that the remaining recordings are marked as downloaded. Try Unhide Downloaded. If no source files appear, check the selected device or card and use Refresh List after restoring its connection.
If Data Download is unavailable, expand the recording groups and select at least one file. Wait for any current device operation to finish.
Download path is not existing means RaceStudio 3 could not prepare a destination folder. Check that the drive is available and choose a folder you can write to in the download preferences before retrying.
Errors downloading file(s) identifies transfer failures; check power, USB or network connectivity, or that the recording card is still available. Errors parsing file(s) means the received file could not be processed for Analysis. Movies without the required metadata can cause this second error. A file present on disk is not by itself confirmation of a usable Analysis session.
The separate Delete command removes selected files from the source after confirmation. Check your PC copies and that the sessions open correctly before using it.
Note
 AiM Tech Tips short video, presented by Bryc Talley: “Downloading Data”.
Click here to open the August 9th, 2024 video.
WiFi and Properties
Use this window to configure the device’s WiFi network settings. If the device does not support WiFi, this section will not be visible.
To connect the PC to a device’s Wi-Fi network, see Available Devices (Wi-Fi).
You can also pre-set fields such as Racer Name and Vehicle Name (among others). These fields will then be automatically populated during the download phase.
Settings
This window allows you to configure device-specific parameters, which depend on the firmware. It is particularly useful for devices without a built-in display, as RaceStudio 3 is their only interface.
Tracks
This window lists all tracks (*.tkk files) stored on the device. Track files are essential, as they provide the device with information for:
Time zones and daylight saving time
Lap timing triggers
Predictive Reference Lap in Device
See Predictive Reference Lap for a complete overview of predictive lap times.
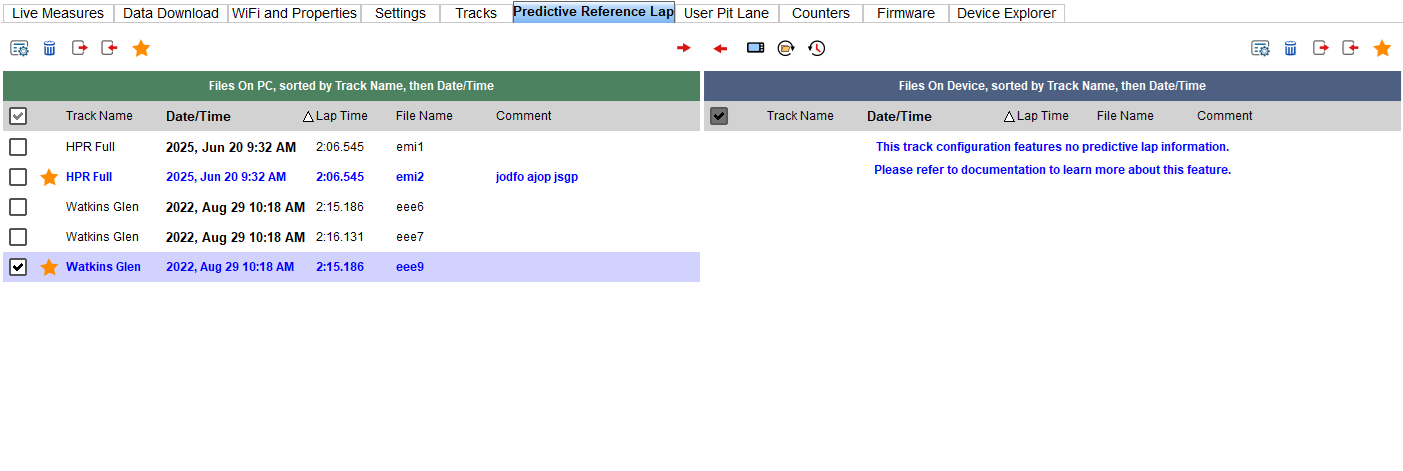
In this window you can set the strategy used to compute predictive times.
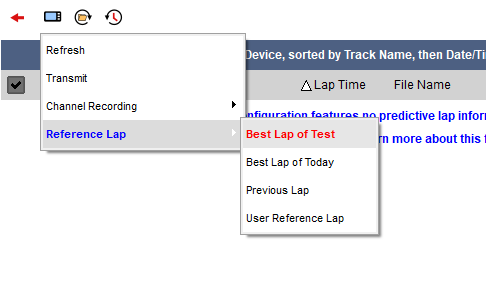
Predictions are always computed against a reference lap, which can be:
The best lap of the session
The best lap of the day
The previous lap
A reference lap saved by RaceStudio 3 Analysis
For reference laps from Analysis (*.prl files), you can select which files to move into your device and which one to set as default.
The lower half of the window contains two file lists: * Left: Files stored on your PC * Right: Files stored on your device
This window also works as a file manager, allowing you to import/export, delete, rename, or add comments to files.
Important
Reference laps are strictly bound to a track configuration. Only one default reference lap file is allowed per configuration. This behavior is similar, but not identical, to user pit lanes (not available in the release version) (see below).
User Pit Lane in Device
Not available in the release version
This feature is currently available in the beta version of RaceStudio 3.
See User Pit Lane for a complete overview of pit lane management.
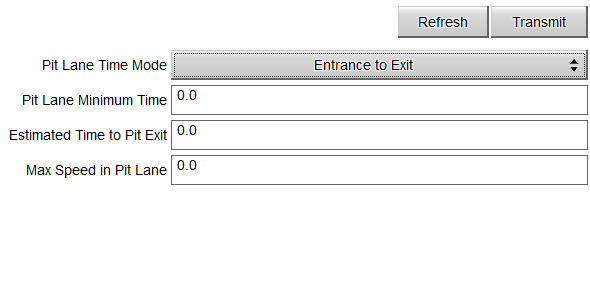
Here you can choose the strategy used by the device to trigger pit lane computations.
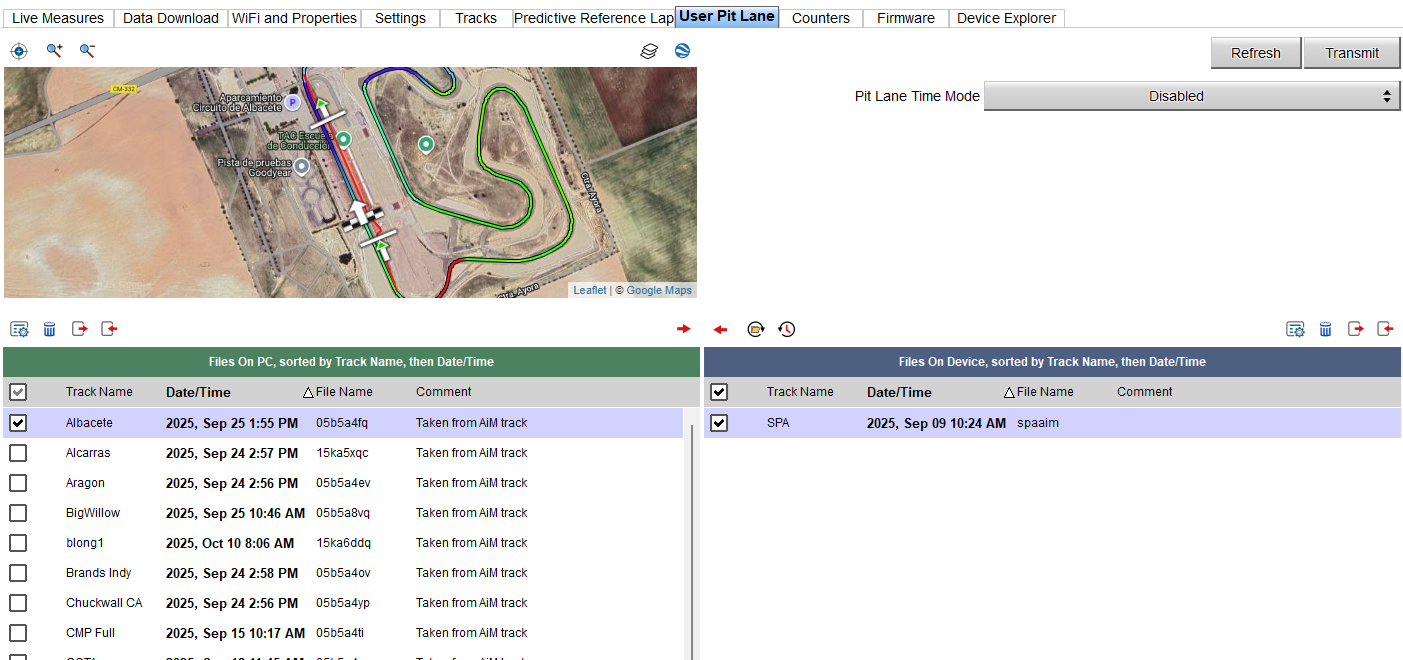
If you have created pit lane files (*.upl files), you can select which to move into your device.
The lower half of the window contains two file lists:
Left: Files stored on your PC
Right: Files stored on your device
This window also acts as a file manager for importing/exporting, deleting, renaming, or commenting files.
Important
User pit lanes are strictly bound to a track’s start/finish line position. When multiple configurations share the same start/finish line, the same pit lane definition can be used across them. This behavior is similar, but not identical, to predictive reference laps.
Counters
This window displays the odometers stored in the device. Depending on the configuration, you can set or reset some of them. On certain devices, fuel usage can also be monitored here.
Startup Logo
This window allows you to customize the startup logo displayed on your device.
Firmware
This window provides an overview of the firmware versions of the device and all connected CAN expansions. A useful option here is Export for AiM, which allows you to send device information to AiM Support.